Friday, June 1, 2012

Don't call it a come back....

I'm back! I hope ya'll have been wondering where I've been these past 6 months. Well wonder no more. It was a tough final semester finishing school but I did it! It feels so great and I'm so excited to be able to return to my hobbies and bring me even more joy. Plus I get to spend more time with my family and my incredible husband.

It wasn't all reading and writing this semester. My lovely sister-in-law Alisha did ask me to do some yummy cupcakes for a bridal shower for her friend. I was excited to be able to create something for her and she was so easy to please. She let me be creative and do whatever flavor combination and style I wanted. Her friends wedding colors were purple and white so I decided to work with that. Then I found this fun tutorial on how to create edible sunflowers from pineapple! I just had to give it a try. Of course you can check out the tutorial here. If your coing to attempt to do these, you'll be thrilled with how easy they are to do. Here are a couple of tips, when you slice the pineapple, let it sit on a few paper towels for an hour or so to get rid of some of the juices. You'll also need to really concentrate on cutting the slices as thin as possible, otherwise it wil take FOREVER to dry out them out into flowers. I actually left mine in a little long in the oven so that they browned around the edges because I really liked the color it created.

It's always super important to me that whatever I create taste great. What's the point in creating something that's pretty but dry, bland or just gross. I want my creations to taste as good as they look! So I went in search for the perfect vanilla cupcake recipe. I didn't have to look far. Glory, over at Glorious Treats (haha get it, Glory, Glorious) had already done all the research for me. She has discovered THE best recipe for vanilla cupcakes EVER. You can find it here. I really wanted to challenge myself with these cupcakes so I decided to fill them with something and if you know me at all you know I love chocolate. And what's better than chocolate ganache? What I was really happy to learn is that it is soooooo easy to make ganache. Of course the amazing folks over at Martha Stewart have a recipe and tutorial for ganache here. To cut the rich taste of the ganache, I decided to top the cupcake with classic vanilla buttercream icing. This was a big challenge for me as I've never been able to successfully make buttercream icing from scratch. I've made may attempts but it always seems to separate. I used this recipe from Magnolia Bakery that I Am Baker posted here. It totally worked! A couple of tips and apparently what I had been doing wrong the whole time you really have to wait for the unsalted butter to reach room temperature and you must use heavy cream. Otherwise, your icing will separate and be super runny and gross. These cupcakes turned out cute and delicious!


I'm so glad to be back to blogging, I missed ya'll and I hope you enjoy these! 

Ciao!

Sunday, December 18, 2011

Holiday Invites

Lately I've been bouncing between pasting and cutting paper and baking and icing cookies. One of my students, Megan, recently told me her Mom needed some invites for a Christmas party. I was excited to do them but it was going to be a challenge since she needed them quickly and I had several papers and groups projects due that week. So I had to be creative and be creative fast! After two trips to Hobby Lobby and two evenings of work, I had 20 beautiful custom Holiday invites. These were so cute, simple and I was so proud of them.


I wish the pictures were a bit clearer, I apologize for that. I layered on top of green textured paper. I put this beautiful white paper that has a great iridescent, shiny effect that reminded me of snow.  I got a little snowflake punch and glued the snowflakes for the martini glass which I glued to actual toothpicks. I also drew the martini glass and cut them by hand. The lettering was printed off my computer. For a nice touch I stamped the envelope with a snowflake.

Debbie and Megan loved them and told me their guests loved them too. It was a great experience to create something quickly that I was happy with in the end.

Ciao!

Thursday, December 8, 2011

Christmas is Here!

Tap, Tap, is this thing on? It's been a whirlwind of a few months but also an exciting few months. Filled with many ups and downs. I was asked by the wonderful Ms. Maria at the Yancey House to make some treats for her guests visiting her beautiful home for the Grayson Tour of Homes. I have never done such a large order, of 200, but was more than willing to try. My Mom graciously allowed me to use her kitchen since mine was very far away and not prepared for so many.

I had made several attempts at a design for these but was not happy with any of them. Finally I spotted a technique I loved.


The pattern was so easy to create. While the white icing was still wet I alternated lines of red and green icing. When that was done I ran a toothpick through the lines, alternating up and down. When the icing was dry, I sanded the tops with gold sanding sugar. Finally the monogram was added for a very personal touch.


We added the business cards to the packages so that the treats would also supply some business for the Yancey House. 

It was a lot of work but I enjoyed the time working with my Mom and teaching her how to do these. I hope you enjoy them too! Merry Christmas to you!

Ciao

Monday, October 31, 2011

For Home and Hearth

Every since I started using Pinterest, I have been continuously inspired to create. There are some fantastically creative people out there. And since there really are no "new" ideas, I've been recreating some of my favorite things on there as gifts.


This one is definitely my favorite. I made it for a friend who is getting married in December. I made some fabulous invitations for her. I'll post those for you later. I wanted to make her a keepsake but also something for her new home. The same scrapbook paper I used for her invitations, I used to make this piece of art! I just added the buttons.


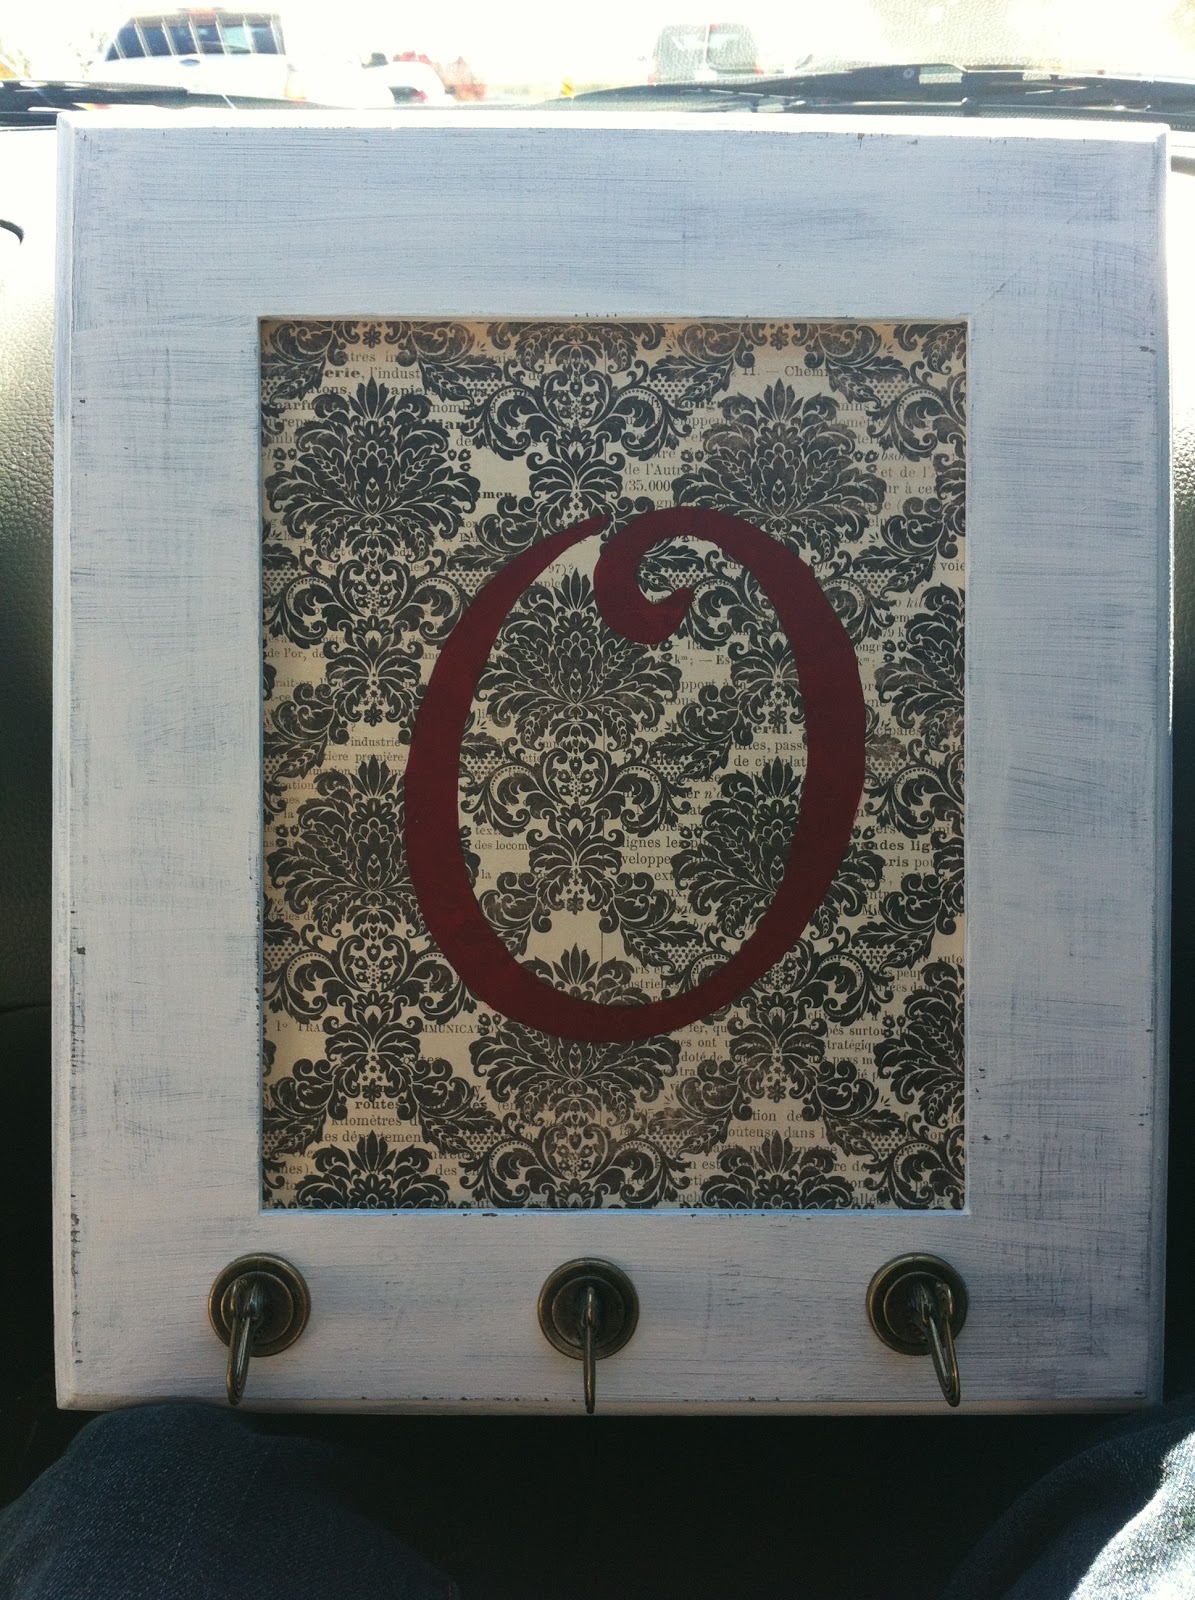
This one I made for my Mom for her birthday. I was pretty impressed with myself on this one. I bought the frame, plain unfinished, the hooks at home depot and painted the letter by hand. I painted the frame grey, let it dry, and then painted it white. The next morning I used sandpaper to scuff it and distress it. I painted the O directly on the scrapbook paper the night before, making sure I didn't s\use too much paint which makes the paper curl.

These gifts were super easy, the frames and scrapbook paper do all the work. I hope you try it out soon!

Ciao!

Friday, October 21, 2011

Fall creations

I love Fall! It's not too hot, not too cold. You get to spend saturdays making chili, watching football, baking apple desserts, driving to the mountains and if you're me making fall creations! I've been bitten by the crafting bug and have been busy creating some fall decor.


This first one is probably my favorite. I wanted a fall wreath for the door and I spotted an adorable creation on etsy that I just had to try for myself. I used a wreath ring, a yard of orange burlap fabric and black and white damask ribbon. I cut the orange burlap into strips about an inch or so wide and 6 inchs long. This took a while and was pretty messy but nothing my vacuum couldn't take care of. I then tied the burlap around the ring alternating between the inside and outside ring. When I got to the end I tied a double bow onto the end. And Viola! a beautiful wreath.


This second project I am pretty proud of because I hand painted the M onto my white pumpkin and dotted the orange pumpkin freehand as well. I know your impressed now too, haha. Both of these pumpkins cost less than $10 to do. The fake white pumpkin I bought on sale at the craft store, I also bought black acrylic and puffy paint. The little real pumpkin I got at the grocery store. It's a cute little pumpkin display for my counter but you could do lots of variations of this for your front porch or dining table.

I hope your enjoying the fall weather.

Ciao!

Friday, October 14, 2011

Southern Centerpieces

I told you guys that a few weeks ago my brother got married. My mom had asked for my help with the rehearsal dinner, which I was thrilled to do! She wanted a southern theme which I loved. We didn't need to do much as mom had rented this beautiful mansion in Loganville called the Yancey House, you guys should definitely check it out. http://www.theyanceyhouse.com/ Maria has done a beautiful job restoring this house and has a great eye for decorating. We used the basement and outdoor garden for the party and it was just beautiful. One of my favorite things was the centerpieces we created.


I found the clothe toile napkins by Waverly on Amazon. They were perfect because no sewing was necessary. We used 3 different sizes of Mason jars and filled them with crushed shells. I loved the sand because it reminded me of pearls which is so very southern. A tealight was placed on top of the sand and lit for a great effect. Finally mom put together some beautiful hydrangea arrangements and we placed them in the center of the mason jars. These we so easy and inexpensive! We did 8 centerpieces for less than $75! They were a great touch to the event and it was a lot of fun collaborating with my mom.

I hope this inspires you to create your own lovely event decor.

Ciao!

Thursday, September 29, 2011

Get Inspired!

This week I have been totally drooling over an app on my iPhone called Pinterest. For those of you who haven't heard of it, you can also access it online at pinterest.com if you don't have an iPhone. Once your there, in order to get in you have to request an invite but they usually send you one within 24 hours. This fabulous website is like a visual blog. You can see great ideas for weddings, outfits, recipes, decorating, DIY and sooooo much more. I am OBSESSED! When you find something you love you just repin it to your own board and are able to go back and look at it later. And you can follow your friends so you can see what they are finding or creating. It is an amazing way to get inspired and come up with your own creative ideas.

Here's an adorable idea I found this week for you brides-to-be. If your having a ring bearer in your wedding, more than likely you'll get him a little pillow to carry down the aisle. I know very few brides who actually put their rings on this pillow and the pillows themselves get very pricey AND once you use it that day it will probably be put in a box to gather dust and take up space. Of course you still want the little guy to carry something because well, it's adorable! SO here's an alternative:


Isn't he CUTE! You can expand this idea in all kinds of ways. If you have more than one flower girl, have each hold an end of the sign. Or if your adventurous like my Mom you can make your own signs for the backs of your chairs at the reception. I've also seen these as directional signs to help lead the way to the wedding.


If your not so adventurous you can buy all of these types of signs on etsy.com and they'll still be handmade and beautiful. I love this personal touch and hope you'll enjoy adding it to your beautiful day.

Ciao!